|
In this
advanced lesson, we are going to go deeper into the
unstructured way of working, which I sometimes call
“planning as you go.” (For more about the difference
between structured and unstructured working styles,
refer to lesson 5 of the
Get
More Done In Less Time ebook.) I call it
unstructured because you don’t have a specific project
or time block to guide you and help you decide what to
work on. Instead, you need to make these decisions on
the spot.
I believe that
structured work using
project blocks is more effective and productive than
unstructured work, especially when you focus on your
most important projects, you take adequate breaks
throughout the day, and you match your projects blocks
with the best times for you to work. That’s why I
emphasize it so much here and in my
Effective Time Management program.
I also realize that you may need to
use unstructured work from time to time to help you be
most productive in certain circumstances, especially if
you have a lot of change and uncertainty in your work
environment.
Achieve Planner provides several tools
to help you find the best tasks to work on when you are
working in an unstructured way and trying to plan as you
go.
- Filters – Achieve Planner
has powerful filtering support that can help you
find the tasks that you need in various views.
- Contexts – Contexts are a
way to tag projects and tasks across different
projects so that they are easier to find and group
together. Contexts could be places, keywords, tags
or categories that help you distinguish and find
tasks across projects.
- Task Chooser – The Task
Chooser is a powerful tool to help you find the best
tasks to work on across all your projects taking
into account several different factors like
priorities and deadlines. Combined with Contexts,
the Task Chooser can help you create a prioritized
daily task list using the tasks in your projects.
- Next Action List – Achieve
Planner’s Outline supports zooming and filtering to
help you narrow in on the next actions you can take
across all your projects.
- Date Filtering – If you
work in a deadline or date-driven environment,
you’ll find deadlines and other dates very powerful.
In this lesson, we are going to look
at how to use Contexts and the Task Chooser to help you
find the best tasks to work on when you are planning as
you go.
We’ll also take a brief look at the
Next Action List support available in the master
outline.
Contexts are a useful way to filter
projects and tasks based on a Context, which is a tag,
keyword or category that you can use to identify the
place, time, or situation (context) where you can best
perform a project or task.
For example, you may create a context
called ‘Phone’ to identify tasks that involve making
calls on the phone. You could define a context called
‘Errands’ to identify tasks you need to do while running
errands, or a context called ‘Home’ to identify tasks
that you can only do while at home.
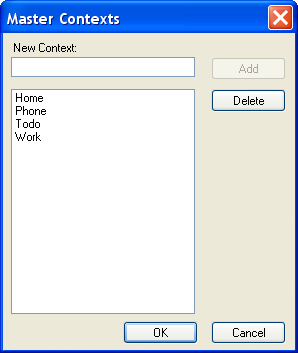
Achieve Planner has a Master Context
List of predefined contexts. These master contexts have
additional support throughout the software. You can
easily add and delete contexts from the Master Context
List using the Options dialog (Tools -> Options) by
clicking on the “Edit Master Context List…” button in
the General tab.
Contexts in the master context list
are included in the dropdown & auto-complete list for
the cells in the grid, and are also available by default
in various context selection dropdown lists.
The Contexts column also includes
predefined filters for the contexts in the master list.
Editing the Master
Context List
To edit the master context list, use
the Tools -> Options menu item and click on the “Edit
Master Context List…” button.
New Achieve Planner data files include
some predefined default contexts like Phone, Todo, Home,
etc.
You can add contexts by typing the
name and clicking the Add button. You can remove
contexts by selecting them from the list and clicking
the Delete button.

Adding Contexts to Projects
and Tasks
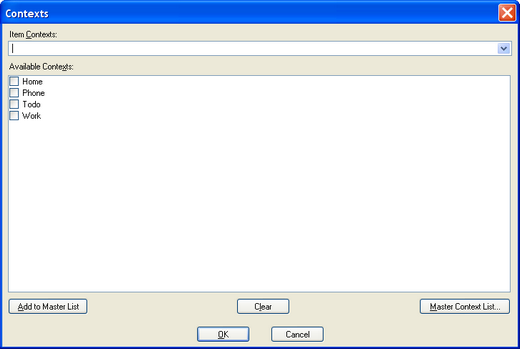
You can add contexts to projects and
tasks directly from the grid, using the Edit ->
Contexts menu item (Ctrl+Shift+2), or by using the Project or
Task information forms.
Projects and tasks support multiple contexts by
separating them with a comma (for example, “Errands,
Phone”.)
You can also set contexts for multiple
rows simultaneously by selecting all the rows and using
the Edit -> Contexts menu item.

Filtering the Grids to View
Certain Contexts
You can easily filter the outline view
to see only tasks associated with certain contexts. To
do this, you use the “funnel” icon in the Contexts
column header.
In addition to the standard filter
entries, the Contexts filter dropdown also includes
special entries of the form [Context] for each Master
Context. These are special filters that include all rows
with a context that contains the specified master
context.
For example, if you select “[Errands]”
as the filter value, that would include tasks with just
the Errands context, but it would also include rows that
contain the Errands context along with other contexts
(like “Errands, Phone”.)
Click here to view the introductory filter tutorial
video.
Understanding the
Task Chooser
The Task Chooser helps you choose what
task to work on next by displaying a list of tasks
across all your projects in a single list.
It does this by “flattening” the
outline and only showing the lowest level tasks in your
outline.
Let’s look at an example of how that
works…
- Project 1
- Parent Task 1.1
- Sub-Task 1.1.1
- Sub-Task 1.1.2
- Parent Task 1.2
- Project 2
In this example, you can see there are
two projects and each one has tasks at various levels.
The idea behind the Task Chooser is
that the only tasks that you can actually do are the
tasks at the bottom of the outline, the ones that don’t
have children. These tasks represent your potential next
actions.
In the outline above, those tasks are
underlined (Sub-Task 1.1.1, Sub-Task 1.1.2, Sub-Task
1.2.1 and Task 2.1.)
Those are the tasks that the Task
Chooser is going to display, the ones that are at the
bottom of the outline across all your projects and the
ones that represent actions that you can actually do.
We’ll explore some of the more
advanced features in the Task Chooser later in this
and other lessons.
Selecting between the
Outline and the Task Chooser
When working in an unstructured way, a natural question is
when do you use the Outline and when do you use the Task
Chooser?
(For the structured style of work, I
recommend using the Tasks tab to focus on a single
project at a time.)
Each one has strengths and weaknesses,
so the answer really depends on your personal
preferences and what you are trying to do.
Use the Outline when:
- You want to see projects and
tasks together in the same outline
- You want to see the parents of
the filtered tasks in the outline
Use the Task Chooser when:
- You want to see a list of tasks
across all your projects
- You want more control over
sorting and filtering
- You want help figuring out the
“best” task to work on
- You need more complex filtering or
sorting to see the tasks you want
- You want to use a daily to-to
list
Understanding the Task
Chooser Window

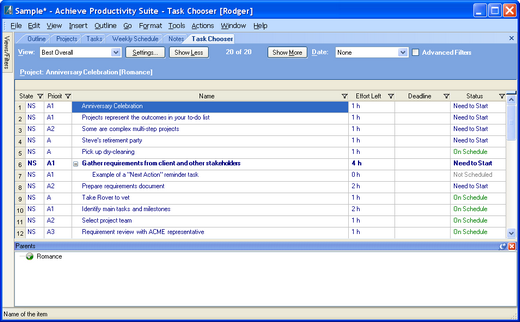
The Task Chooser tab consists of the
following elements:
-
View selector
dropdown - Use to select the “view” that the task
chooser displays... you can customize the view to
show different columns and settings.
-
Settings... button -
Controls the Task Chooser settings for the current
view. Use it to change filtering and sorting
settings of the task chooser view.
-
Show Less - Show
fewer items in the grid
-
x of n - Label shows
you many items are shown in the grid
-
Show More - Show more
items in the grid
-
Date filter dropdown
- Use this to filter items by their dates
-
Advanced Filters -
Show advanced filters (see below)
-
Project Label -
Displays the project for the selected row
-
Grid - Displays the
flattened, filtered and sorted list of tasks
-
Parents Panel - Displays
the parent hierarchy for the selected row
All the tasks in the Task
Chooser are at the
bottom of the hierarchy (tasks without children). The
only exception are any 'Next
Action Reminders' that these bottommost tasks may
have.
For example, in the image
above, the task Gather requirements from client and
other stakeholders has a next action reminder under
it (called 'Example of a "Next Action" reminder task')
By default, the task
chooser sorts entries using a 'Score' that is computed
using various criteria like priorities, dates,
deadlines, etc.
You can change the
default sorting by clicking on the Settings... button,
which will bring up the Task Chooser Settings dialog.

You can then adjust the
sorting for the current Task Chooser view by clicking on
the Sort button.
Task Chooser
Views
Achieve Planner currently
supports the following task chooser views:
Best Overall –
Best tasks across all your projects regardless of result
area.
Todo List - Useful
for creating a prioritized daily to-do list. By default,
this is sorted using the Task Chooser Priority column
(see below).
Best work-related
– Displays the best tasks across all projects belonging
to work result areas (in the Work category.)
Best personal –
Displays the best tasks across all projects belonging to
personal result areas (in the Personal category.)
Urgent – Displays
urgent tasks across all projects. Has different scoring
values for dates.
Deadlines –
Displays tasks with deadlines across all projects. Has
different scoring criteria for deadlines.
Best in Project Block
– Displays the best tasks in the current project block
(weekly schedule) for the current time. If there is no
current project block, displays best overall instead.
Printing - Useful
for printing a Task Chooser based task list
You can change the
default settings for each view using the Settings...
button, and you can change the columns using the View ->
Customize Current View menu item.
Related Lessons
|