|
Achieve Planner supports the
concept of a ‘Next Action List’ for projects in the
master Outline and Task Chooser.
In this tutorial, I'm going to show you
how to create and plan a project for a birthday party,
and then use the Next Action List to focus in on the
next actions for this project.
Here is what the birthday party
project looks like in the Outline:
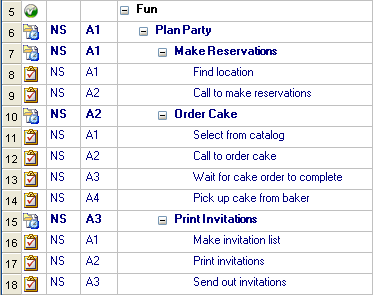
The main ‘Plan Party’ project has
three sub-projects, ‘Make Reservations’, ‘Order Cake’,
and ‘Print Invitations’.
The reason these are sub-projects is
that they represent multi-step parts of the main project
that are somewhat independent of each other, and one
could conceivably make progress on them in parallel.
Depending on your preferences, and how
you use Achieve Planner, you could also represent them
as top-level tasks of the ‘Plan Party’ project instead
of sub-projects.
Viewing the Next Action List in the
Outline
You can toggle the display of the
‘Next Action List’ in the master outline using the Next
Actions Only checkbox available in the Outline tab, or
using the equivalent keyboard shortcut (Ctrl+Shift+8).
When the ‘Next Action
Only’ mode is enabled, the outline is filtered so that
only ‘next action’ tasks are displayed under each
project.
There are two versions of
‘Next Actions,’ a simpler ‘basic’ version for new
users, and an ‘advanced’ version for more experienced
users who want more freedom in defining what a next
action is.
You can change the
definition of ‘Next Action’ used by Achieve Planner in
the Next Actions tab of the Options Dialog (Tools ->
Options) as I describe later in this tutorial.
Using the Basic ‘Next
Action’ Definition
By default, ‘Next Action’
tasks are defined as the highest priority tasks under each project
in the Outline priority sort order.
This is what the ‘Plan
Party’ project would look like with the Next Actions
List filter turned on.
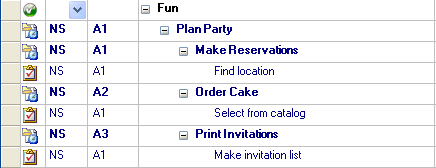
You’ll notice that the Outline now
only shows one task under each sub-project following the
Outline priority sorting order.
NOTE: Starting with the 1.9.6 release,
if you have multiple A1 tasks under a project, they will
ALL show up as Next Actions since they all share the
highest priority. This definition allows you to have
multiple next actions under a single project.
When you complete a task in any of
these sub-projects, the next available task under that
project is displayed. For example, this is what the
outline looks like when you’ve completed the ‘Find
location’ task of the Make Reservations project…
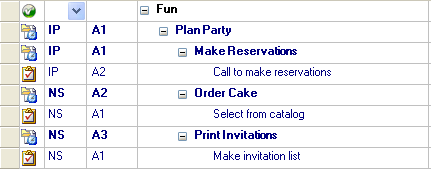
You can see the next action ‘Call to
make reservations’ is now in the list.
Next Action Settings
The Options dialog (Tools -> Options)
has some settings that control the display of the Next
Action List in the Outline and Task Chooser.
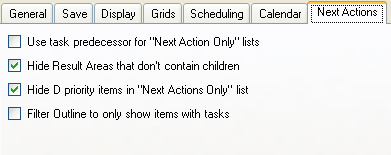
‘Use task predecessor for “Next
Action Only” lists’ controls whether to use the
basic (unchecked) or advanced (checked) definition of
‘Next Action.’ It’s set to basic definition by default.
‘Hide Result Areas that don’t
contain children’ controls whether to hide result
areas that don’t contain children when displaying the
Next Action list in the master outline.
‘Hide D priority items in “Next
Actions Only” list’ controls the display of D
priority items (and their descendants) in the Next
Action list of the master outline. If the box is
checked, then D priority items and their descendants
will not be included in the next actions list.
If ‘Filter Outline to only show
items with tasks’ is checked, whenever the ‘Next
Actions Only’ mode is turned on, the Outline tab will
automatically be filtered in the Icon column so that
only items containing tasks are included in the list.
The filter is automatically removed
when ‘Next Actions Only’ mode is turned off. You can use
this setting to control the display of
projects/sub-projects that don’t have any next actions
available.
You can download a free 30 day trial
of Achieve Planner to test drive this feature and see if
it will work for you...


Using the Advanced ‘Next Action’
Definition
If you want more control over which
tasks are ‘Next Actions,’ you can use the advanced
definition by enabling it from the Options dialog.
With the advanced definition, ‘Next
Action’ tasks are defined as tasks that either don’t
have predecessor tasks defined or that only have
completed predecessor tasks.
In the birthday party planning project
example, let’s say that the predecessor relationships
between the various tasks look like this…
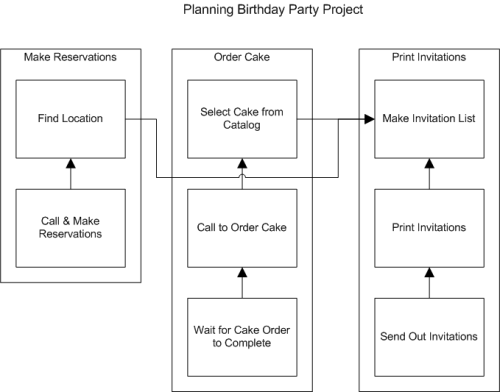
In this diagram, each box represents a
task and the arrows point to the predecessor task. For
example, before you can do the ‘Print Invitations’ task,
you must do the ‘Make Invitation List’ task first.
That’s why ‘Make Invitation List’ is the predecessor.
As you can see, you can have
predecessor tasks in a different project. In this
example, ‘Make Invitation List’ is also a predecessor
for ‘Find Location’, because you can’t find a suitable
location until you know how many people are invited.
You can establish the task predecessor
relationship between tasks using the Task Predecessor
field/column available in the Outline and Tasks tabs.
The Task Predecessor column is
available in the ‘Active Planning’ view of the Outline.
You can also add it to any of the other views using the
‘View -> Customize Current View’ command.
This is how you would represent these
predecessor relationships in the Active Planning view of
the Outline.
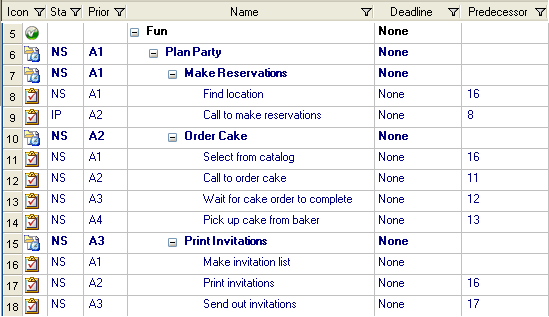
You can see the relationships between
the tasks in the Predecessor column. For example, you
can see that ‘Make invitation list’ is a predecessor for
‘Find location’, ‘Select from catalog’ and ‘Print
invitations’ because its task row number (#16) is in the
predecessor column for these three tasks.
There are two ways to establish a
predecessor relationship between two tasks:
1) Enter the Row Number (the number in
the gray header at the start of each row) of the
predecessor task in the Task Predecessor cell for the
dependent task.
For example, task # 16 ‘Make
invitation list’ is a predecessor of Task # 17 ‘Print
invitations’ because the number 16 is in the Task
Predecessor cell for row # 17.
2) Another way to establish
predecessor relationship between tasks is to use the
Actions -> Link Tasks command, which helps you establish
this type of predecessor relationship based on the order
of the tasks in the Outline.
You need to select all the task rows
that you want to link, and then use the Actions -> Link
Tasks command to link them in the order they appear in
the Outline.
Here is what the Next Actions List for
the party planning project looks like when you turn the
‘Next Actions Only’ mode on using the advanced next
action definition that uses task predecessors.

You can see that ‘Make invitation
list’ is the only task shown. The list also includes
sub-projects ‘Make Reservations’ and ‘Order Cake’ since
they are sub-projects rather than tasks.
Having these ‘empty’ sub-projects in the list reminds
you that there are parts of the Plan Party project that
you can’t advance because you don’t have any available
next actions.
NOTE: You can choose not to see these ‘empty’
sub-projects by changing some of the settings as I
describe later in the tutorial.
Here’s what the list looks like when you complete the
‘Make invitation list’ task.
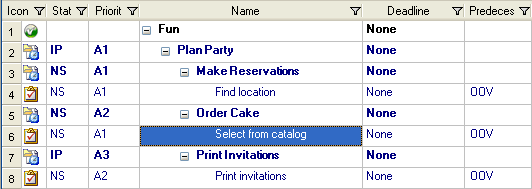
The previously dependent tasks are
showing as next actions because their predecessor task
is now completed.
The ‘OOV’ in the Predecessor field indicates an
“out-of-view” predecessor that is not visible in the
current view. In this case, this is the task you just
completed that is not visible in the Active views. To
change or remove these predecessors, switch to the 'All
Items' view.
You can download a free 30 day trial
of Achieve Planner to test drive this feature and see if
it will work for you...


Filtering ‘Empty’ Projects & Sub-Projects
To automatically hide empty projects and sub-projects
from the Next Actions Only display, you need to enable
the ‘Filter Outline to only show items with tasks’
setting in the Options dialog.
Here is what the original Next Action Only list
(advanced NA definition) looks like when this setting is
enabled.

As you can see, the ‘empty’
sub-projects under the Plan Party project are now
filtered out of the display. You can tell that the
column filter is active because the funnel icon on the
Icon column header is blue.
You can change or disable this filter manually by
clicking on this funnel icon and selecting (All) from
the dropdown.
Multiple ‘Next Actions’ Under a
Project
One of the advantages of the
‘advanced’ next action definition is that it allows you
to have multiple Next Actions under a project or
sub-project based on the task predecessors.
For example, if we add a ‘Buy Stamps’
action to the ‘Print invitations’ sub-project that is
independent of the ‘Print invitations’ action, the
resulting Outline would look like this:
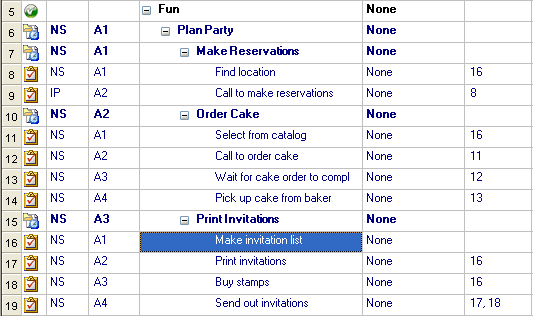
Also notice that we’ve now made Task
‘Send out invitations’ (#19) dependent on both ‘Print
invitations’ (#17) and ‘Buy stamps’ (#18) because you
can’t send out the invitations until you do both.
Here’s what the Next Action List looks
like when you complete the ‘Make invitation list’ task:
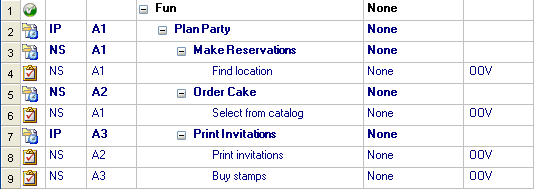
You can see that both ‘Print
invitations’ and ‘Buy stamps’ are now shown as possible
next actions. Furthermore, ‘Send out invitations’ will
only be displayed in the Next Action List when both of
these tasks are completed.
NOTE: You can accomplish something
similar in the basic next action list by having multiple
tasks with the highest priority.
You can download a free 30 day trial
of Achieve Planner to test drive this feature and see if
it will work for you...


Viewing Next Actions in Task Chooser
The
Task Chooser can also be used to display a ‘Next Actions
Only’ list by changing some of its task chooser settings
for a view.
Checking the “Only show next action(s)
for project” limits the display of tasks in the task
chooser to next actions using the same interpretation
used in the Outline with the following exceptions:
1) The task chooser next action
setting can be overridden at the project level using a
checkbox available in the Project Information form’s
general page
2) To produce the same next action
list as the Outline when using the ‘basic’ definition of
next action, you also need to check the “Use task
priority order for next project actions” box in the
settings.
Using the ‘Basic’ Next Action
Definition
For the basic next action definition,
you just need to check both of the boxes in the Task
Chooser settings for the current view…
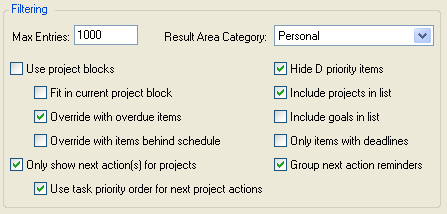
Here is what the task chooser looks
like with these settings changes for the “Best Personal”
view of the task chooser…

Using the Advanced Next Action
Definition
For the advanced Next Action
definition, the same setting “Only show next action(s)
for projects” needs to be checked in the task chooser
views, but the “Use task priority order for next project
actions” needs to be UNCHECKED.
Here is what the Next Action list
looks like in the task chooser when the advanced
definition is enabled in the Options.

Now only the ‘Make invitation list’
task is shown because the task predecessors are hiding
the other two tasks shown in the previous view.
You can download a free 30 day trial
of Achieve Planner to test drive this feature and see if
it will work for you...


|