|
This quick tutorial shows
you how to use Achieve Planner to implement David
Allen's Getting
Things Done (GTD) methodology.
It's based in part on the
excellent advice and guidance from GTD users that have
shared their experience in the community forums.
After going through this
tutorial, you'll see why some of our GTD users have
called Achieve Planner a "killer" GTD app.
1. Work With
Projects and Tasks Separately
Achieve Planner is
a practical system that helps you to quickly and easily capture, organize, and
manage all your projects and their tasks in one central
place.
Achieve Planner uses tree-like outlines,
which means you can break-down large items into smaller
steps using as many levels as you need.
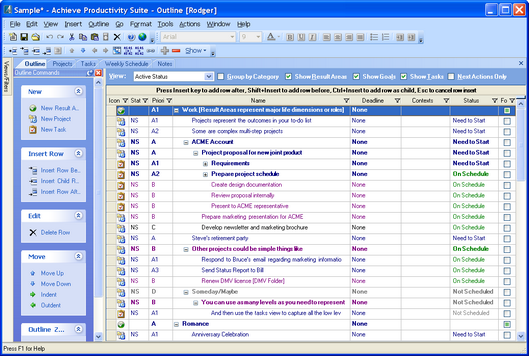
Click On Image to View Larger Size
One of the problems with traditional
to-do lists is that they tend to lump everything you
need to do together into one big long list without any
order or structure.
As you get more and more things to do,
your to-do list becomes bigger and more chaotic, and
pretty soon you get lost in all the details. You can’t
see the forest for all the trees that are surrounding
you.
Separating Projects & Tasks
That's why Achieve Planner makes a
distinction between projects (the outcomes) and tasks (the
action steps.)
Projects are a good way to collect,
group and organize tasks that are all contributing to
the same common purpose. Projects are a logical “container”
to organize related tasks.
If you
follow this model for organizing your tasks, you’ll end
up with the following structure:
1) A Master Project List that
contains a list of all your projects
2) A Task List for each project
that contains only the tasks for that project
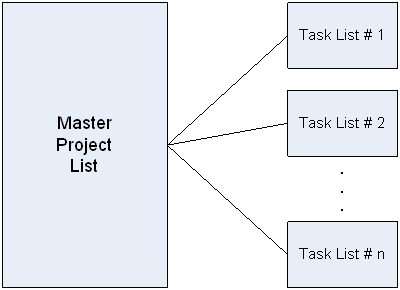
Separating projects from their tasks
means that your Master Project List will be smaller,
easier to organize and manage, and will give you an
overview of all the outcomes you are working on.
Focusing on outcomes and not just actions helps you work
more effectively throughout the day, increasing your
personal productivity and helping you get things done.
Your project-specific Task List helps
you focus in on just the tasks for one specific project
without getting distracted or overwhelmed by everything
else that is on your plate.
|
"After trying Achieve
Planner for nearly two months I can honestly
say that it has revolutionized the way I
work.
I have an incredibly busy
schedule so I need something that can cope
with a multitude of tasks, projects and
appointments whilst at the same time keeping
me focused on what is most important.
Achieve Planner does all of this and much
more besides.
Over the years I've tried
pretty much every system on the market and
nothing, absolutely nothing, comes anywhere
close to this. It looks great, works
superbly, comes with excellent instructions,
is a pleasure to use, but most important of
all - IT REALLY WORKS!
For anyone who wants to
get organized and take their productivity to
the next level Achieve Planner is an
absolute must. It's one piece of software
that I'm certain I'll be using for many
years to come."
- Paul Smithson |
2. Collecting
Your 'Stuff' in Your Inbox
Achieve Planner provides
several tools to help you capture your projects and
tasks into your productivity system.
You can always enter projects and
tasks directly into the
Outline, but you can also use the 'Quick Task Entry'
feature to speed up the process.
You can access the Quick Task Entry
from the Achieve Planner notification icon in the
Windows taskbar or by using a configurable Hot Key, by
default (Alt+Win+T)
that you can invoke from any application.
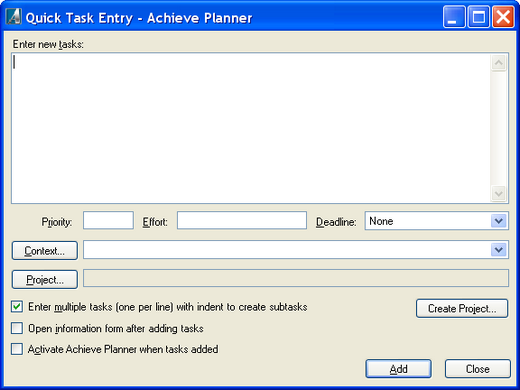
From here, you can create
one or more tasks (using indentation to create
subtasks).
By default, all new tasks
created this way are stored under the 'Inbox' project
for later processing, but you can also assign them to a
specific project instead.
Video Tutorial (link
opens in new window):
3. Organizing New Projects/Tasks
When you collect new
projects/tasks without specifying a parent project,
Achieve Planner stores them in a special Inbox
project for later processing.
When you are ready to
process them, you can use the New Task Organizer
Wizard (available from the Tools menu) to help you
decide how to handle them...
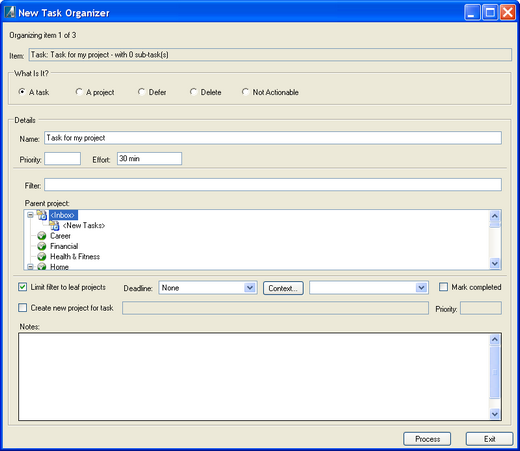
Click Image to View Larger Size
The Wizard helps you
decide what type of item it is (a project, a task, a
non-actionable note/reference item, or something to
delete right away.)
You can then change the
name/priority, set the parent, and add other details
like context and deadline.
You can also defer
the item to a future date for later processing (like a
tickler file).
Video Tutorial (link
opens in new window):
Project Templates
You can use any existing project as a
template for creating a new project. Using templates can save you a
lot of time if you have events, checklists, procedures, or
other recurring projects that all have a similar set of tasks.
To create a new project from a
template, you use the File -> New -> New Project From Template
menu item.
This will bring up a dialog that will
help you select the project that you want to use as the template for
the new project instance.
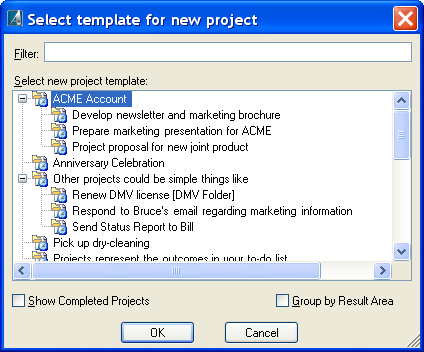
Then you can customize the new
project instance as needed...
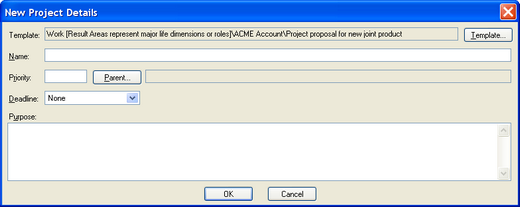
before adding it to the outline.
Some tips for getting the most from
project templates:
-
I recommend creating a special
'Templates' project to store/organize all your templates
-
Add a prefix to all your template
projects (like 'TP-') to make them easier to find using the template
chooser dialog filter.
-
Set the priority of template projects to
D to hide them in the Task Chooser
4. Finding Next Actions and
Getting Things Done
Achieve Planner is very flexible. It
helps you to plan as you go
and select 'next actions' across all your
projects.
Contexts
Achieve Planner fully supports the GTD-style
contexts, which are a useful way to tag related
tasks across projects.
For example, you could tag tasks
based on location (home vs. work), type of activity
(phone), or simply to tag them for easier filtering
(Errand, Todo or Urgent.)
You can then use filtering to help you
find your tagged tasks quickly and easily.
Viewing the Next Action List in the
Outline
Let's say that you create a project for a birthday party. Here is what the birthday party
project looks like in the Outline:
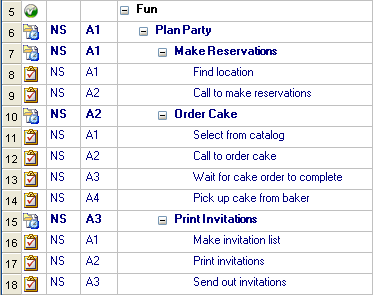
The main ‘Plan Party’ project has
three sub-projects, ‘Make Reservations’, ‘Order Cake’,
and ‘Print Invitations’.
The reason these are sub-projects is
that they represent multi-step parts of the main project
that are somewhat independent of each other, and one
could conceivably make progress on them in parallel.
Depending on your preferences, and how
you use Achieve Planner, you could also represent them
as top-level tasks of the ‘Plan Party’ project instead
of sub-projects.
Next Action Only List
The Outline tab supports filtering your
outline to only show the next actions available in each
project.

You can toggle the display of the
‘Next Action List’ using the Next
Actions Only checkbox available in the Outline tab, or
using the equivalent keyboard shortcut (Ctrl+Shift+8).
When the ‘Next Action
Only’ mode is enabled, the outline is filtered so that
only ‘next action’ tasks are displayed under each
project.
There are two versions of
‘Next Actions,’ a simpler ‘basic’ version for new
users, and an ‘advanced’ version for more experienced
users who want more freedom in defining what a next
action is.
Click here to learn
more about advanced next action filtering.
Using the Basic ‘Next
Action’ Definition
By default, ‘Next Action’
tasks are defined as the first task under each project
in the Outline priority sort order.
This is what the ‘Plan
Party’ project would look like with the Next Actions
List filter turned on.
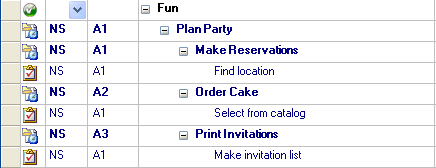
You’ll notice that the Outline now
only shows one task under each sub-project following the
Outline priority sorting order.
When you complete a task in any of
these sub-projects, the next available task under that
project is displayed. For example, this is what the
outline looks like when you’ve completed the ‘Find
location’ task of the Make Reservations project…
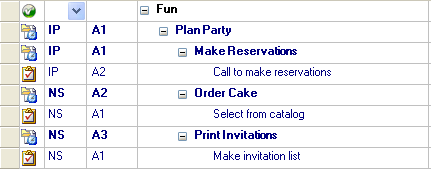
You can see the next action ‘Call to
make reservations’ is now in the list.
Task Chooser Tab
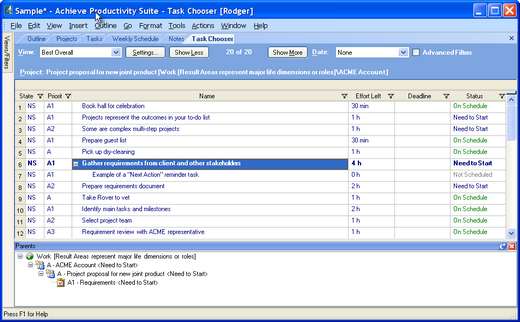
The task chooser (Go -> Task Chooser
menu item) displays a sorted and
filtered list of tasks across all your projects ranked using configurable
criteria like priority, context and deadlines.
Click Image to View Larger Size
The Task Chooser gives you a flat list of
next actions across all your projects. You can use
advanced filtering to display only tasks matching
certain contexts or branches in the outline.
Click here to learn more about using the Task
Chooser to display your next action list.
Powerful Filtering
Achieve Planner has powerful filtering
support to help you find the best tasks to work on next.
You can use the funnel icon in the column header to
filter the values in that column.
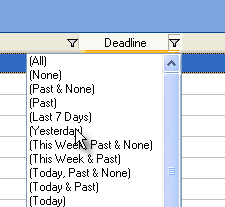
Once you've setup the filter conditions
you want, you can save a snapshot of the filters using
the 'View/Filters' panel at the top-left edge of the
main screen.
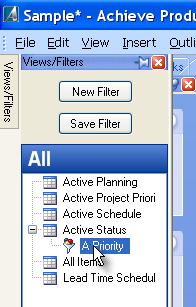
Click on the 'New Filter' button to
create a new filter snapshot of the current filter
conditions.
Video Tutorial (link opens in new
window):
-
Filters - How to use filters in Achieve Planner to
filter the grids
5.
Flexible Planning and Execution
Achieve Planner's
flexible planning and execution style also supports
weekly planning, weekly
reviews and other hybrid approaches where you combine
GTD and other time management methodologies like
Franklin Covey, DIT, Autofocus, or RPM.
6. Advanced
Productivity Tools
Achieve Planner also
supports advanced goal setting, life planning, and other
productivity tools like importing emails from Outlook
and advanced scheduling.
Click here to learn
more.
30-Day Trial
- Try Achieve Planner for Free
I have so much confidence
in Achieve Planner, that I'm willing to give you a
free 30-day trial so that you can take it for a
spin and see
for yourself if it will work for you.
|
"As I stated in a previous
message, the "Achieve Planner software" is
the "BEST"
on the market today. I've used Act, and
PlanPlus software for several years and
these programs can not compare to Achieve
Planner. You've captured all of the time
management tools I've wanted for many years
rolled in to
one fantastic designed package.
The free "complete" trial
version really provided the
opportunity to really test drive your
program.
I'm sold on the Achieve
Planner software, and will be purchasing
the program as soon as I send this message.
Great job!"
- Harold Zimmer |
It's easy to get started right away...
Click here to download
your free 30-day trial of Achieve Planner today!


Unconditional 100% Money Back Guarantee
Not only do I offer you a
free 30-day trial, but I also give you an unconditional 100% money back guarantee once you decide to purchase.
 60-Day Money Back Guarantee 60-Day Money Back Guarantee
If you are not completely satisfied
with Achieve Planner, just let me know within 60-days of
your purchase and I promise you a prompt and courteous
refund.


|